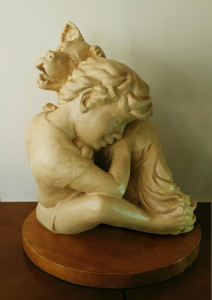
Plaster mold making is a skilled craft all its own. Many artist prefer to pass this on to trades persons rather than tackling the complicated and time consuming task. For me, I see this as a challenge, and besides, I’m a bit of a control freak. Maybe I’ve got trust issue, but I don’t want anyone else handling my statue. Michelangelo had originally hired the services of a foundry to cast and pour his larger than life bronze statue of Pope Julius II. Complaining that the quality was so poor, that far more time was spent correcting the pocked marked and pitted surface than if he had thrown it away and started over from scratch. I’m sure quality control has improved much since the Renaissance… But still, I like to be hands on.
As with all my other statues, each mold is unique and requires on-the-spot adjustments… ‘Brothers’ will need a spray foam top to ensure it lays flat within the tipping box.
With the help of silicon and duck tape, the mold is ready for slip or pressed clay. As this is my first cast, I have chosen to press the clay to ensure the correct thickness. With variations from a thicker bottom to thinner top.
The advantage of pressed clay is that the plaster pieces can be removed at my own pace…. The thicker clay is stronger and so, far more forgiving. With a poured slip, often cracks or stress fissure will open up as the clay shrinks and pulls away from the surface of the mold. With thicker pressed clay, I can effectively take several days to slowly move around the statue and remove each piece while working the clay surface.
The clay can be worked and smoothed until it’s perfect. This is where you can really play with shape, textures and colours. For this first rendition of Brother, I have chosen a light brown coloured clay and have chosen a fired temperature that best bring out a light tan; cone 5. Finished with a lacquer preservative Brothers is now complete. St Francis and the Wolf are forever captured in this playful tackle.


